| |
| 1. |
|
|
| |
| 1.1 |
Common
|
|
| |
| 1.1.1 |
Record Table Demo. |
|
|
[445,65,150,20]:Display record no. of the record table: The record table s no. will be updated according to the entered no. by clicking “updated” button.
[5,295,560,140]:Export Excel function: You can export all information of the selected record table by pressing F8 key. This function is only available for “@Admin” group s member..
[425,65,20,20]:【F】button: You can store additional files for selected record in the record table like documents, pictures or other format files by clicking this button.
[440,275,140,10]:Record table searching function: Record table will be sorted by clicking the record table s column, and it will be located to your desired record by typing the related words for the column in the field.
[5,295,560,10]:Record table adjustment: you can drag and drop the record table s column to your desired position and then save it by clicking right mouse button.
|
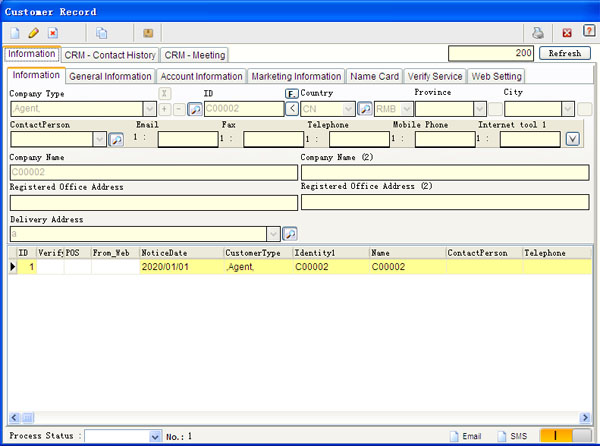
Photo1 |
|
| 1.1.2 |
Button |
|
|
[3,25,50,50]:Graphic button【Add】:Add a new record.
[53,25,45,50]:Graphic button【Edit】:Edit the selected record.
[98,25,45,50]:Graphic button【Delete】:Delete the selected record.
[143,25,50,50]:Graphic button【Save】:Save the selected record.
[485,25,50,50]:Graphic button【Print】:Print the current content of records.
[535,25,50,50]:Graphic button【Exit】:Exit the current window.
[440,218,40,20]:【Load】 button:Load the related files to the ERP system.
[540,218,40,20]:【Upload】 button:Upload the related files from client to the server.
[480,218,20,20]:【Download】 button:Download the related files from server to client. |

Photo1 |
|
| 1.1.3 |
Order Generating Demo. |
|
|
[320,70,270,20]Import.swf:Import area In here you can change the order type by pressing Change button. After you select the order type, then import your desired order to current order.
[170,110,160,25]OrderType.swf: Menu【Order Type】:Click 【…】button to add or edit the order type.
[20,130,50,20]ImportClientID.swf:【ID】button:Click‘…’button first to select your desired customer or vendor, and then click “ID” button to import the customer and vendor s data to the current order.
[5,240,320,35]:【Delivery】area: You can set different delivery addresses according to each customer or vendor, so that you just only select the address of this customer or vender for the order in here.
[305,280,20,20]: Button【C.】:This button is for remark to use. After you click “C” button, you can add and edit information in remark record, also you can import remark information to the current order.
[135,415,55,20]CheckCost.swf:【Check Cost】button: In this button, you can check the product price or cost according to the order s customer or vendor.
[185,415,55,20]checkstock_F.swf:【Check Stock】button: In this button, you can check the specify product s quantity in different warehouses, further of the in our record, too.
[450,415,130,20]:【Total】button: Add all products price or cost together in the current order by clicking this button.
[5,303,560,90]: 【Order product】record table : Right mouse button in order s product record table: When you click the right mouse button inside the quotation product record table, you can find the following.
1. Intelligence price: According to your selected method in the “check cost” button, the price will be generate correspondingly.
2. Packing All: the packing information will be calculated for all products.
3. Packing All: the packing information will be calculated for the selected product.
4. BOM: The BOM information will be imported according to the selected product.
[490,305,30,90]:【non-printable】function: Inside the order s product record table, you can find a “PRI”, the selected product will not be printed out when you tick it.
[520,305,35,90]:【non-delivery】 function: Another one is “CTS”, the selected product will not be delivery in stock when you tick it. |

Photo1 |
|
| 1.1.4 |
System Interface Demo. |
|
|
[0,0,600,450]:Window
[5,25,580,50]:Panel
[135,25,50,50]:Graphic button
[215,115,225,27]:Label and field
[180,260,50,20]:Button
[5,75,320,40]:Label
[5,280,580,140]:Record Table
[70,170,205,50]:Menu
[445,110,140,110]:Picture frame
[170,280,190,10]:Record table s column
[170,310,190,10]:Record table s field
|
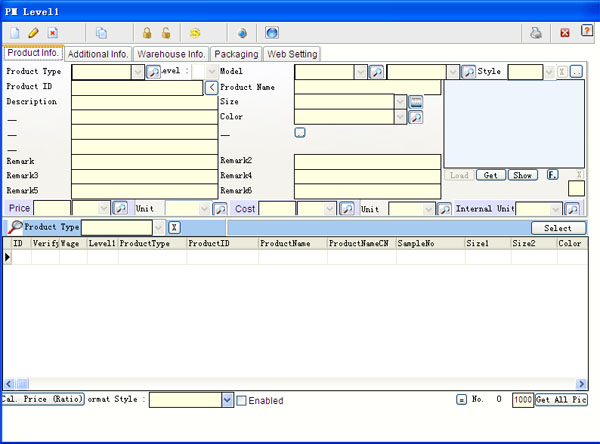
Photo1 |
|
| 1.1.5 |
Order Button |
|
|
[8,85,140,20]:【Processing,Deal,Completed】Tab: Order records can be separated into different status for user to inquiry easily.
[195,25,80,50]Qdeal.swf:Graphic button【Verify and Un-verify】: This function mostly is used by manager for double checking. The order is verified, all information would not be changed except un-verify it.
[100,25,90,50]QVerify.swf:Graphic button【Deal and Cancel deal】: Order has been verified, “Deal” button is available to use especially for quotation record. After press “Deal” button, quotation will generate sales order automatically.
[280,25,50,50]:Graphic button【Delivery】: The order has been verify, this button will appear for you to delivery goods from or to the warehouse.
[330,25,50,50]:Graphic button【Packing List】: Generate packing list according to the order information by this button.
[5,25,50,50]Payjournal.swf:Graphic button【Journal】:Double click the order that you want to generate account journal automatically. You just type in the related accounting information after press “Journal” button.
|

Photo1 |
|
| 2. |
General Information |
| General Information: |
| |
| 2.1 |
Customer Record
|
|
| |
| 2.1.1 |
General Tab |
|
|
According to the related field to enter your customer s information.
[400,20,80,50]CustomerService.swf:Graphic button【Product / Service】: You can record the corresponding products or services in here for the selected customer record including the product s refer code, price or etc.
[325,205,120,30]:Menu【Following Status】: You can set different “following status” to different customers for separating them into different segments.
[445,205,120,65]:Menu【Transfer】: You can transfer selected customers to different sales to follow up.
[250,220,60,20]:【Vendor】Checkbox: The same record will be shown in Vendor record by clicking this checkbox.
[130,205,120,30]CustomerDelivery.swf:Menu【Delivery Address】: Press the button beside the “Delivery Address”, then you can add more delivery addresses for your selected customer in record table.
[15,110,190,35]:【Company Type】district: You can add and choose more than one company type for each customer in here.
[15,175,120,30]:Menu【Contact Person】: You can choose contact persons which are under the selected customer, and you can add more than one contact persons for each customer by clicking the button beside the menu.
[325,235,120,35]:【Reminder】district: Set the remind date for you to follow the particular customer on time in the record table.
|
Photo1 |
|
| 2.1.2 |
Account Tab |
|
|
After saving the customer all information, the system will generate a unique account code to the customer.
[367,115,194,58]:【Account Code】district: After saving the customer record, account code will be generated.
[13,177,98,30]:【Credit Amount】field: You can set the credit amount to different customers that the system will lock the sales order or delivery note correspondingly .
[491,170,70,40]:【Discount】field: After you set the discount to the customer, the discount rate will be taken automatically when you open sale order or quotation. |
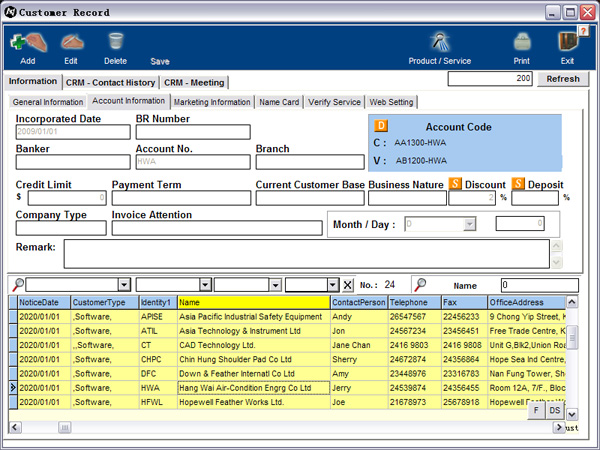
Photo1 |
|
| 2.1.3 |
Marketing Tab |
|
|
Set the sales commission rate and return goods ratio to the customer
[15,120,230,30]: 【Commission Rate】field: This commission rate will be calculated when you generate any sales reports for the particular sale.
[30,160,100,40]: 【Return goods ratio】field: This setting is to limit the return goods quantity for the customer. |
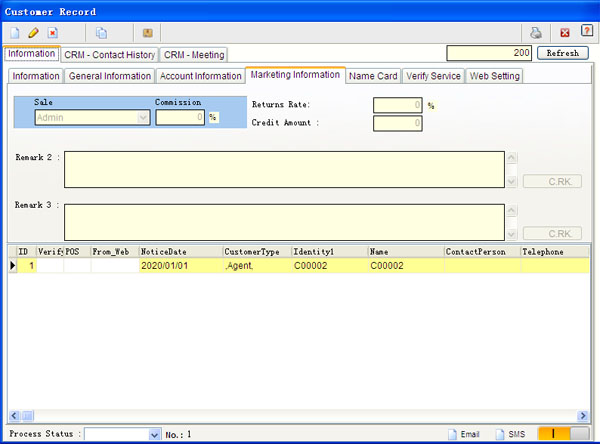
Photo1 |
|
| 2.1.4 |
Name Card Tab |
|
|
|
[10,110,580,160]: 【Name Card】district: This area can let you uploading name card images files to the ERP system for each customer. |
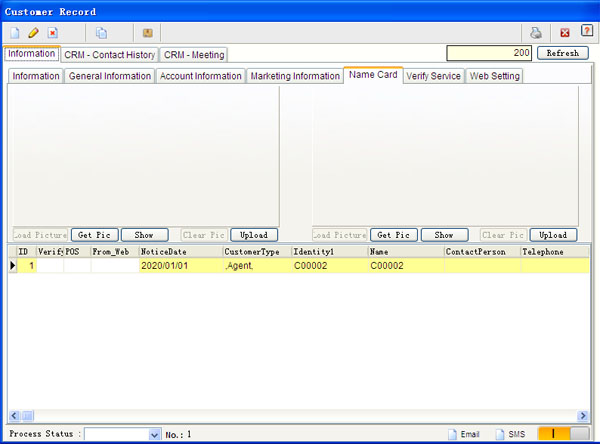
Photo1 |
|
| 2.1.5 |
Customer Service Tab |
|
|
|
[15,240,180,20]:【Customer verify】district: After verifying the customer in here, this customer record cannot be edited or deleted by anyone in the system. |
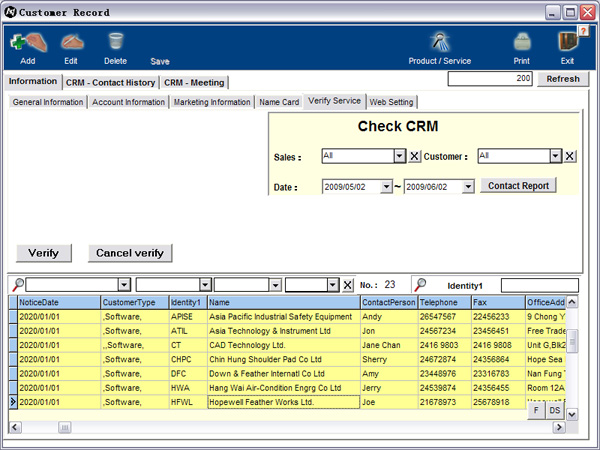
Photo1 |
|
| 2.2 |
Material or Product Record
|
|
| |
| 2.2.1 |
General Information |
|
|
[5,70,180,20]:【【Level】TabSheet:Products, semi-products and materials can be separated into 5 levels in here. From the 1 level is material level, other upper level that you can use for product level or semi-product level until the 5 level. Each product can be assembled by lower level material or semi product.
[195,25,50,50]MaterialCopy.swf:Graphic button【Copy】: If you have similar products to be added into the record, this button can memorize the character of the selected product or material and then paste it except the product ID.[440,125,145,110]MaterialPic.swf:【Image】area: You can add image which is in jpg format to different product and material in here.
[380,195,40,20]:【Hidden]checkbox: After you tick this field, such record would be hidden in the record table. The hidden record would be displayed only after choosing on the top of the interface. It is used for material or product which has been suspended.[325,25,50,50]:Graphic button【Price Update】: The price of material and product would be automatically increased or decreased according to your entered percentage, so as to lighten the workload brought by changing the whole of the products’ price.
[5,200,90,20]:【Multi line】button:You can enter product information with on limitation in here for enriching the product data
[]:File managment: You can add different formats of pictures, document and audio files which can be stored for each product.
[5,425,100,20]:【Price Calculation】button: As for those semi-product or finished product which has been recorded into BOM, the price of such semi-product or finished product can be automatically calculated according to the cost of material’s combination by clicking "Price calculation", and will be displayed in the orange field on the right side of the "Cost". |
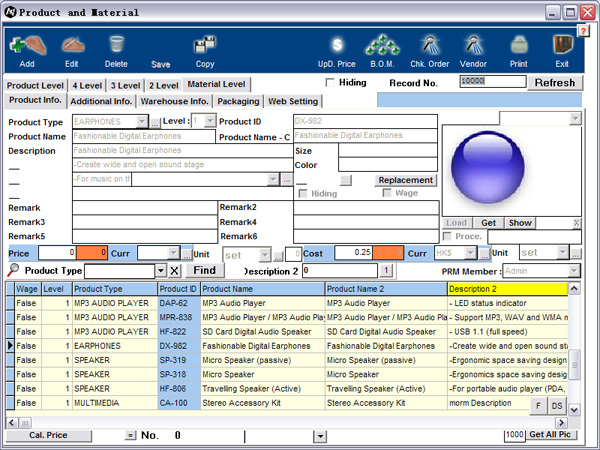
Photo1 |
|
| 2.2.2 |
Packaging |
|
|
|
[5,110,420,140]:【Packing info.】area: set packing pattern for each material or product. The packing pattern will follow the product or material which delivering in or out throughout the company workflow. |

Photo1 |
|
| 2.2.3 |
|
|
|
[5,145,155,20]:【Satefy Quantity】Field: After you set the safety quantity of each product or material. you can compare each material and product automatically in stock record by clicking the "safety stock".
[5,225,195,20]:【Appoint Warehouse】area: set the unique warehouse to material for production. After setting, the material will be only picked up by the appointed warehouse.
[280,225,225,20]:Menu【Sample No.】:set the latest sample order number for each product. the system will always use this for the production calculation.[300,130,285,35]:【Bar code】area: Bar Code will be automatically generated by the product s productID. Check out or check in goods can be scanned by the bar code. The bar code could be used in quotation, sales confirmation, purchase order, invoice and other documents, also in the POS system. |
Photo1 |
|
| 2.3 |
Company Record
|
|
| |
| 2.3.1 |
General Information Tab |
|
|
Enter the company information into the related fields.
[20,100,170,20]:Menu【Company Code】: From A to Z, 26 letters for each of your own companies in your company record. [340,90,240,30]:【Generate Account Code】area:Select your company type, then the ERP system will generate account code to the accounting system according to the company type. [20,245,235,20]:【Country】field: This field relate to the currency which the whole ERP system will be used for the default currency for the particular company.
|
Photo1 |
|
| 2.3.2 |
System Setting Tab 2 |
|
|
[5,70,260,200]:【multi-verify】area: You can set multi verify function to different orders including Quotation, Sales order, Purchase Order and so on. Press the button beside the order and then you can set the verify group/s or member/s for each order.
[280,270,110,20]:【TST DataSet】button: You can set the formula, save requirement and other functions for each data set in here.
[390,270,200,20]:【TST Field】button: You can set different characteristics to each of the fields in the whole ERP software.
[280,225,300,40]CompanyOFormat.swf:【Order additional fields】area: You can change the additional fields names in each order in here.
[280,175,300,50]CompanyPFormat.swf:【Product character】area:You can change the product / material record s character s names in here to be suitable for your own product.
|
Photo1 |
|
| 2.3.3 |
Software Logo Tab |
|
|
|
[10,100,580,230]:【Software image】area: The front page image will be shown on the interface after you login the system. And also you can load the selected company s logo and chop that will be shown on the top of the print out format |
Photo1 |
|
| 2.3.4 |
System Setting Tab 1 |
|
|
[280,225,300,40]CompanyOFormat.swf:【Order additional fields】area: You can change the additional fields names in each order in here.
[280,175,300,50]CompanyPFormat.swf:【Product character】area:You can change the product / material record s character s names in here to be suitable for your own product.
|
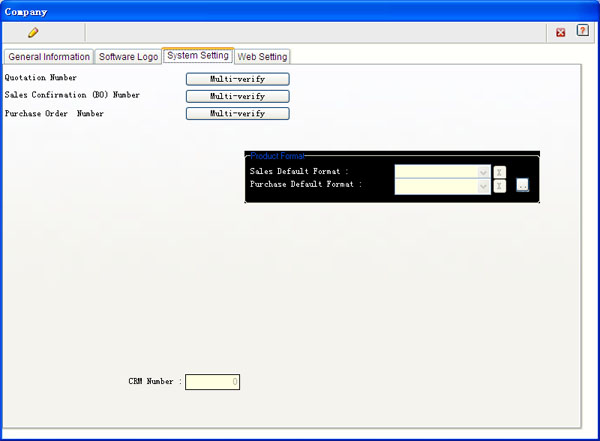
Photo1 |
|
| 2.4 |
Country Record
|
|
| |
| 2.4.1 |
Country |
|
|
|
In here you can record country, country code and related currency for order, customer or vendor record to use.[ |
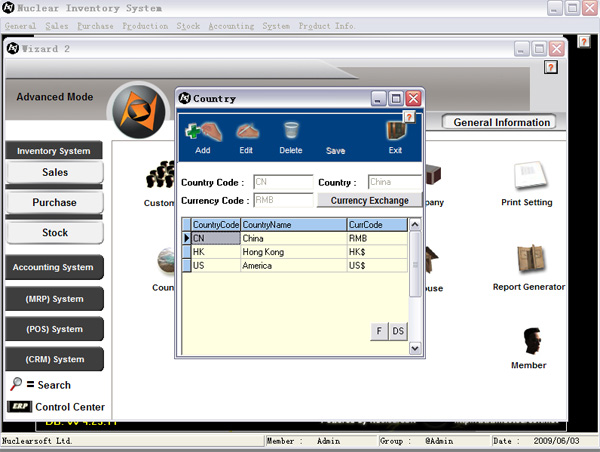
Photo1 |
|
| 2.5 |
Currency Record
|
|
| |
| 2.5.1 |
Country |
|
|
|
Record the different currency with country, also the currency rate for order calculation. [ |

Photo1 |
|
| 2.6 |
Unit Record
|
|
| |
| 2.6.1 |
Unit |
|
|
|
Record the different unit for order s product to use directly, also the exchange rate of the unit for calculation in order.[ |

Photo1 |
|
| 2.7 |
Print Setting
|
|
| |
| 2.7.1 |
Common Printing Setting |
|
|
Generate ERP order print out format
[5,35,190,20]:Translate order name area: Click the language button, all order s print out name will be changed automatically to the corresponding language.
[5,60,190,100]:Order list: The list will list all order name here for you to select.
[210,60,185,100]:Order print out list: After selecting the order from the order list, order print out list will show the corresponding order print out formats for user to select.
[210,160,185,20]:Edit Order print out format area: In here you can add, edit or delete order print out format from the list.
[420,55,70,50]:FastReport Edit area: After selecting the print out format\, you can go in Fast Report interface to edit the print out format by yourself.
[420,100,70,80]:Load print out format area: In here you can load the external .fr3 format to the current print out format.
[520,155,50,20]:Hide checkbox: You also can hide the print out format to prevent other user to select.
[5,385,255,20]:Company picture area: download your company s related picture for the print out format to use.
|
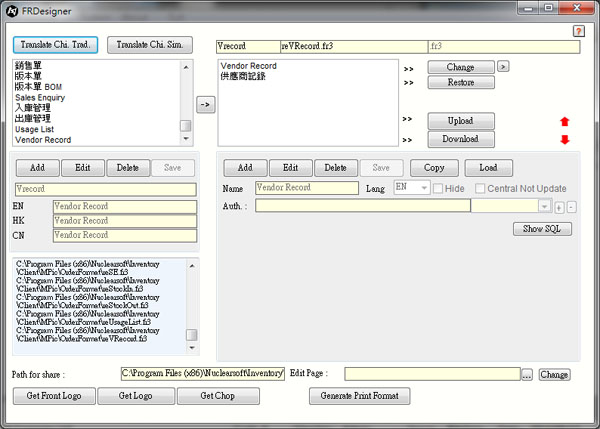
Photo1 |
|
| 2.8 |
Vendor Record
|
|
| |
| 2.8.1 |
|
|
|
After saving the customer all information, the system will generate a unique account code to the customer.
[367,115,194,58]:【Account Code】district: After saving the customer record, account code will be generated.
|
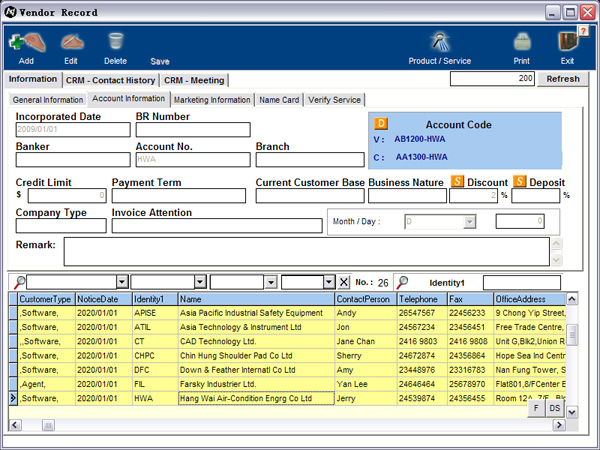
Photo1 |
|
| 2.8.2 |
|
|
|
Set the sales commission rate and return goods ratio to the customer
[15,120,230,30]: 【Commission Rate】field: This commission rate will be calculated when you generate any sales reports for the particular sale.
[30,160,100,40]: 【Return goods ratio】field: This setting is to limit the return goods quantity for the customer.
|
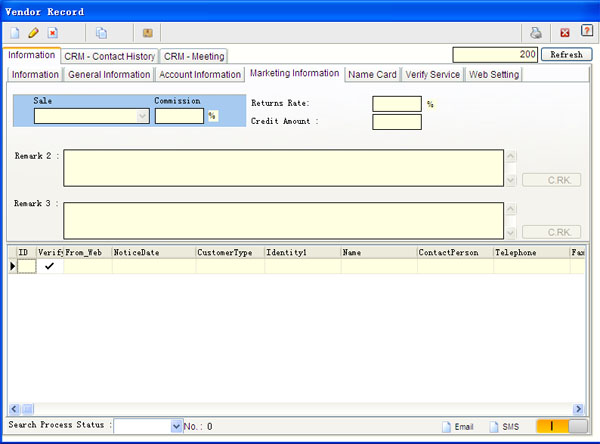
Photo1 |
|
| 2.8.3 |
|
|
|
|
[10,110,580,160]: 【Name Card】district: This area can let you uploading name card images files to the ERP system for each customer. |
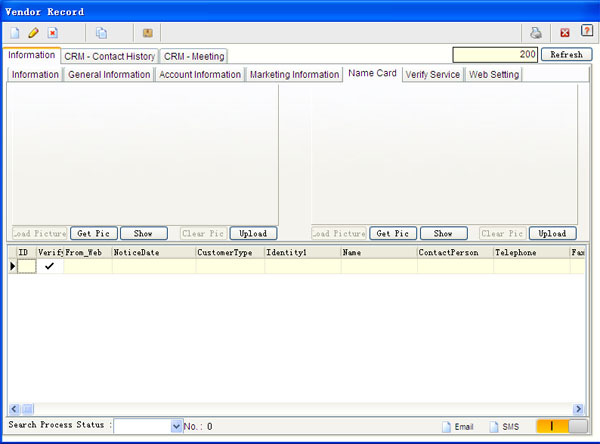
Photo1 |
|
| 2.8.4 |
|
|
|
|
[15,240,180,20]:【Vendor verify】district: After verifying the customer in here, this customer record cannot be edited or deleted by anyone in the system. |
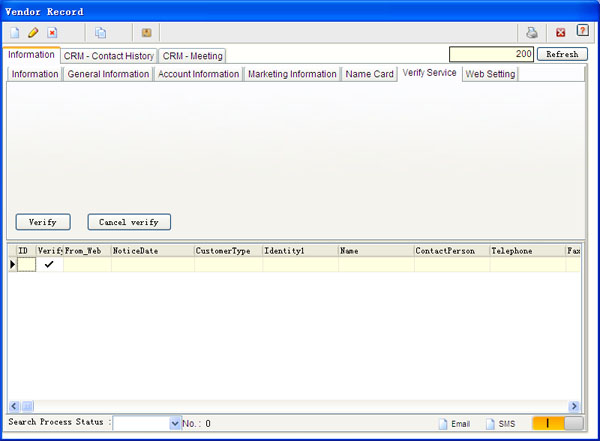
Photo1 |
|
| 2.8.5 |
|
|
|
According to the related field to enter your customer s information.
[400,20,80,50]CustomerService.swf:Graphic button【Product / Service】: You can record the corresponding products or services in here for the selected customer record including the product s refer code, price or etc.
[325,205,120,30]:Menu【Following Status】: You can set different “following status” to different customers for separating them into different segments.
[445,205,120,65]:Menu【Transfer】: You can transfer selected customers to different sales to follow up.
[250,220,60,20]:【Vendor】Checkbox: The same record will be shown in Vendor record by clicking this checkbox.
[130,205,120,30]CustomerDelivery.swf:Menu【Delivery Address】: Press the button beside the “Delivery Address”, then you can add more delivery addresses for your selected customer in record table.
[15,110,190,35]:【Company Type】district: You can add and choose more than one company type for each customer in here.
[15,175,120,30]:Menu【Contact Person】: You can choose contact persons which are under the selected customer, and you can add more than one contact persons for each customer by clicking the button beside the menu.
[325,235,120,35]:【Reminder】district: Set the remind date for you to follow the particular customer on time in the record table. |
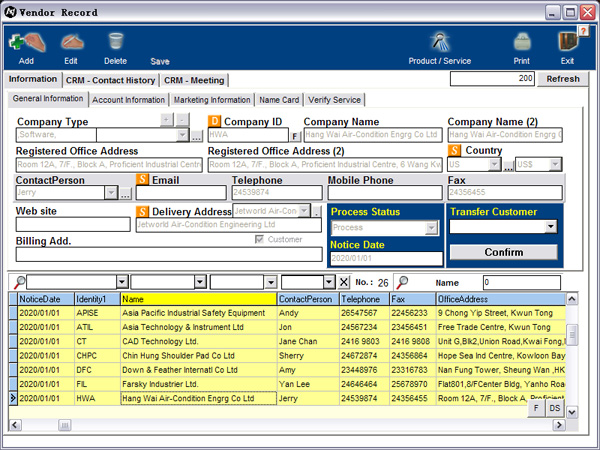
Photo1 |
|
| 2.9 |
Warehouse
|
|
| |
| 2.9.1 |
Stock |
|
|
|
In here you can set up your company warehouses for delivery in and out goods.[ |
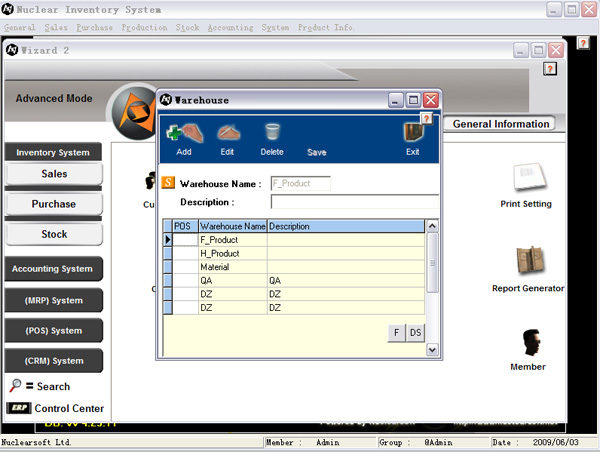
Photo1 |
|
| 2.10 |
SQL Report
|
|
| |
| 2.10.1 |
SQL Report Record Table |
|
|
Demonstration#Please click(swfpage.asp?swfpage=AddSQLReport.swf)#
[5,25,225,20]:【Report Type】area: Classify different reports to different type.
[5,50,560,110]:【Report】record table: List all SQL reports in the ERP system.
[470,25,115,20]:【Add or Edit report】button: Enter to the report editor to edit the selected report.
[5,160,560,20]:【Report Enquiry condition】area: Select the report enquiry condition first, and then the report will be generated by the corresponding selected conditions.
[260,180,70,20]:【Enquiry】button: After you select the conditions, the report information will be shown as below.
[420,180,110,20]:【Report】button: Report will be generated after pressing this button.
[360,180,60,20]:【one record】checkbox: The report will only be shown the record that you selected.
[5,180,110,20]:【Debug Panel】button: This is the panel for technician to debug the selected report.
[5,200,560,140]:【Report Enquiry】Table record: List the information that you enquiry.
|
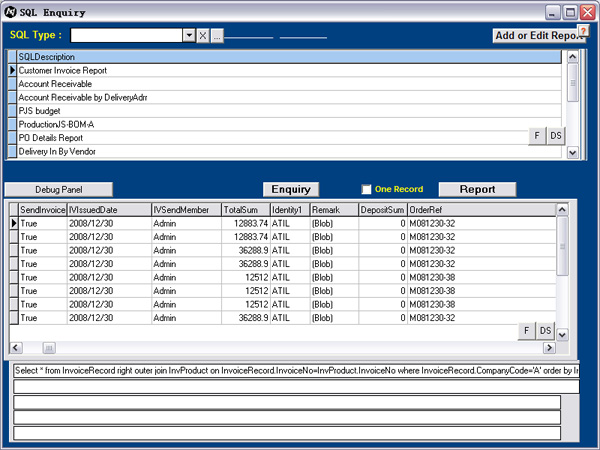
Photo1 |
|
| 2.10.2 |
Add SQL Report |
|
|
[5,75,350,45]:【Input】area: it uses for the report source code.
[5,120,570,30]:【Authority】area: Set the selected report authority for different member groups to view.
[5,160,570,65]:【Report Information】area: Enter the related information for the selected report.
[5,225,520,100]:【SQL】area: Set the SQL for the report run.
[360,85,60,20]:【Right arrow】: It will generate the related information of the report from the source code.
[430,80,145,40]:【Report format】area: After generate the information by the source code, you can load the related report format to the system.
[450,160,60,20]:【Up arrow】: Generate the source code to the “Input” area according to the following information.
[1,325,575,60]:【Enquiry condition】area: Set different parameters to the report, it is useful for the report generation. |
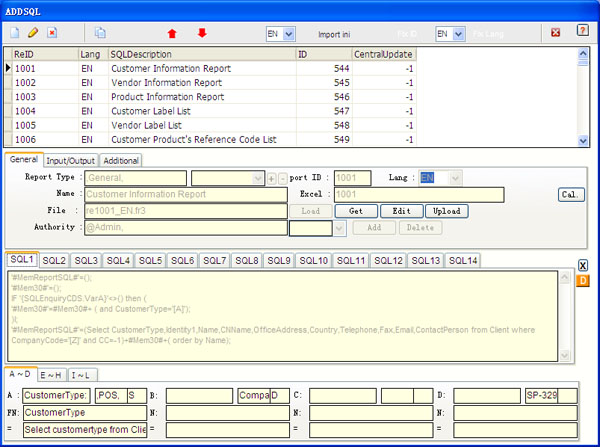
Photo1 |
|
| 3. |
Sales |
| Sales: |
| |
| 3.1 |
Sale Confirmation
|
|
| |
| 3.1.1 |
Sales Order |
|
|
General Information: Enter the information to the corresponding field in quotation including customer, products, remark and so on.
Generate order demonstration: <# Please click(FullF_pop1.asp?cid=330)#>[ |
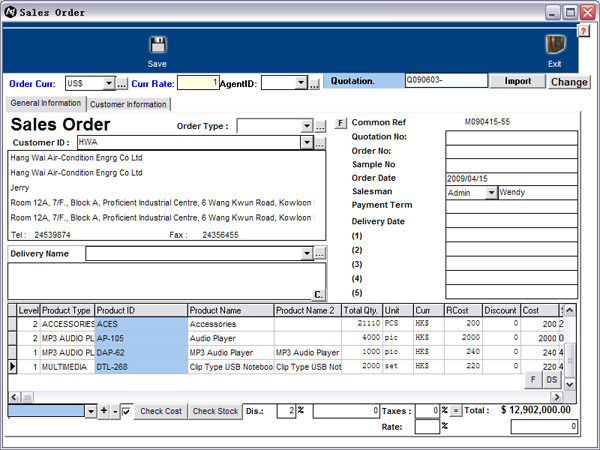
Photo1 |
|
| 3.1.2 |
Sales Order Record |
|
|
Demonstration#Please click(swfpage.asp?swfpage= SalesOrderAdd.swf)#
Order Buttons demonstration:<#Please click(FullF_pop1.asp?cid=345)#>
Table record demonstration:<#Please click(FullF_pop1.asp?cid=284)#>
Buttons demonstration:<# Please click(FullF_pop1.asp?cid=156)#>
[280,25,100,50]:Graphic button【Completed】: select the completed order to press this button, the order will transfer to another tab.
|
Photo1 |
|
| 3.2 |
Quotation
|
|
| |
| 3.2.1 |
Quotation Record |
|
|
Demonstration #Please click(swfpage.asp?swfpage=QAdd.swf)#
Order Buttons demonstration:<#Please click(FullF_pop1.asp?cid=345)#>
Table record demonstration:<#Please click(FullF_pop1.asp?cid=284)#>
Buttons demonstration:<# Please click(FullF_pop1.asp?cid=156)#>
[355,22,50,50]:Graphic button【Delivery】: If Proforma invoice function is open in ERP server, this button will be shown when the quotation is dealt.
[405,22,45,50]:Graphic button【Invoice】: If Proforma invoice function is open in ERP server, this button will be shown when the quotation is dealt.
|
Photo1 |
|
| 3.2.2 |
Quotation |
|
|
General Information: Enter the information to the corresponding field in quotation including customer, products, remark and so on.
Generate order demonstration: <# Please click(FullF_pop1.asp?cid=330)#>[ |
Photo1 |
|
| 3.3 |
Delivery Note
|
|
| |
| 3.3.1 |
Delivery Note Record |
|
|
Demonstration#Please Click(swfpage.asp?swfpage=Delivery.swf)#
[295,25,70,50]Delivery.swf:Graphic button【Goods arrangement】:After you click the “Goods arrangement”button, you can delivery goods to your warehouses separately.
[395,25,50,50]:Graphic button【Packing List】:Print the list of the package information for the delivery note.
[445,25,45,50]:Graphic button【delivery note】:Print the delivery note.
[490,25,45,50]Invoice.swf:Graphic button【invoice】:Generate invoice by your selected delivery note in the interface, and then print out to your customer
[450,90,130,20]:【Show】button: Display the delivery goods of the delivery note record for you to check.
[5,90,90,20]:【Processing, Completed】Tab: After you generate invoice, the delivery note record will go to the completed status automatically.
|
Photo1 |
|
| 3.3.2 |
Delivery Note |
|
|
In here you can arrange the goods delivery for the delivery note.
[5,130,220,20]:Menu【warehouse】:Select the warehouse that you want the goods to be delivered from.
[225,125,355,20]:【Mark Goods】area:After you mark the goods in the warehouse for the Sale order. The goods will be kept in the warehouse for you to handle except you release the goods.
[160,240,50,50]stockout_S.swf:Graphic button【reminder】:Remind you that how many goods is owed to your customer for the sales order.
[250,240,50,50]stockout_S.swf:Graphic button【delivery】:After you select the goods in the particular warehouse, you can press this button and enter the quantity to be delivered from the warehouse. There are three mode of the delivery. 1.Auto delivery (delivery all goods from the warehouses step by step automatically and by first in first out method);2.FIFO Delivery (First in first out method for your selected goods);3.submit (just delivery the warehouse goods for the selected product)
[350,240,50,50]Qbadgoods.swf:Graphic button【Bad product】:After your customer return the bad product to you, you can mark the bad goods in here, also you can make the debit note for accounting.
[450,240,50,50]Qmoregoods.swf:graphic button【More product】:If you delivery goods to your customers free of charge or additional charge that you can use this button to do it.
|
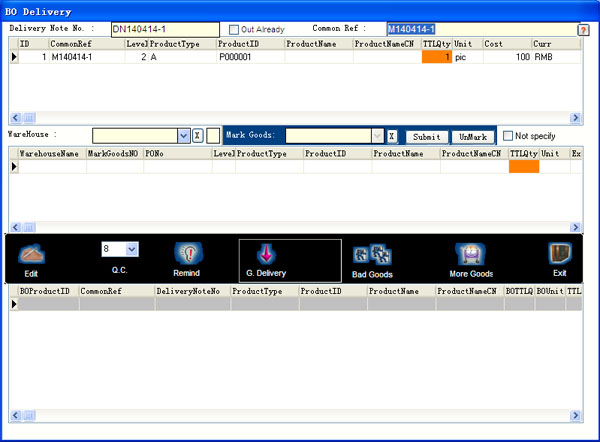
Photo1 |
|
| 4. |
Purchase |
| Purchase: |
| |
| 4.1 |
Purchase Order
|
|
| |
| 4.1.1 |
Purchase Order Record |
|
|
Demonstration#Please click(swfpage.asp?swfpage=POAdd.swf)#
Order Buttons demonstration: <#Please click(FullF_pop1.asp?cid=345)#>
Table record demonstration:<#Please click (FullF_pop1.asp?cid=284)#>
Buttons demonstration:<# Please click (FullF_pop1.asp?cid=156)#>
[295,25,100,50]PoComplete.swf:Graphic button【Completed】:select the completed order to press this button, the order will transfer to another tab.
|

Photo1 |
|
| 4.1.2 |
Purchase Order |
|
|
|
Generate order demonstration: <#Please click(FullF_pop1.asp?cid=330)#>[ |
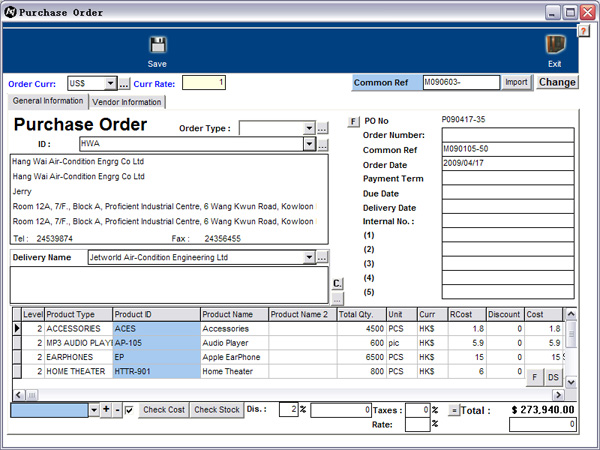
Photo1 |
|
| 4.2 |
Stock In Order
|
|
| |
| 4.2.1 |
Stock In Order Record |
|
|
Demonstration #Please click(swfpage.asp?swfpage=DeliveryIn.swf)#
[355,25,70,50]DeliveryIn.swf:Graphic button【Goods arrangement】:You can receive goods to specific warehouse by different Stock In Order in the interface after pressing this button.
[445,25,45,50]:Graphic button【Stock In Order】: Print the Stock In Order information and the received products.
[490,25,45,50]:Graphic button【Payment Order】: Generate Payment Order to the accounting system by selected Stock In Order after pressing this button.
[450,90,120,20]:【Show】the received goods button: Show the selected Stock In Order products as below.
[5,90,90,20]:【Processing, Completed】Tab:Separate processing Stock In Order which is not generated by the payment order and the completed order into different folders.
|
Photo1 |
|
| 4.2.2 |
Stock In Order |
|
|
[12,45,560,150]:【Purchase Order Product】record table:The record table at the top of the window show the purchase order product.
[12,260,560,150]:【Goods received】record table: The record table at the bottom of the window show the received goods.
(notice: it also shows the all products of different Stock In Orders but in the same purchase order)
[90,210,50,50]:Graphic button【reminder】:list out all the goods which is owed by the vendor.
[140,210,50,50]:Graphic button【transfer warehosue】:You can transfer product from one warehouse to another by this button, and also record each transaction for reference.
[190,210,50,50]:Graphic record【Transfer History】:Record all transferring goods transactions in here for reference.
[240,210,100,50]:Graphic button【Delivery】:Select the goods that you want to delivery to your warehouse by this button.
[340,210,70,50]:Graphic button【Bad Material】:record the bad materials from the vendor, and can generate debit note to vendor in here.
[440,210,50,50]:Graphic button【More Material】: Some material that the vendor sends to you additionally, you can record in here for the payment order
|

Photo1 |
|
| 5. |
Stock |
|
| |
| 5.1 |
Stock In
|
|
| |
| 5.1.1 |
Stock In Order |
|
|
[10,310,100,20]AddDeleteStockInProduct.swf:button【+】:Select product of material that you want to add in your warehouse after pressing this button.
[110,310,10,20]AddDeleteStockInProduct.swf:button【-】:delete the selected item in the product record table.
[120,310,40,20]:‘Auto’checkbox:tick the “Auto” checkbox, you can use digital scanner to add items to the product record table automatically.
|
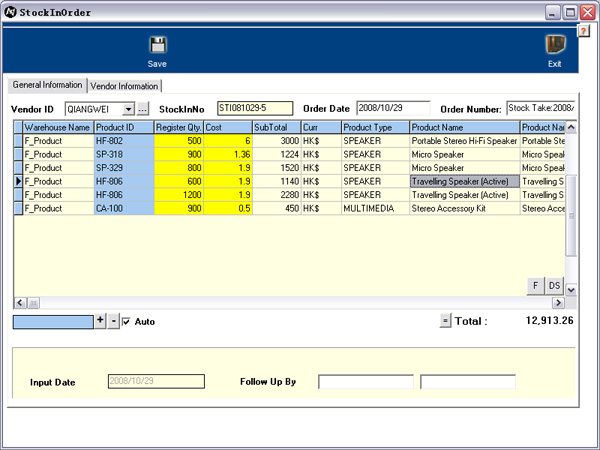
Photo1 |
|
| 5.1.2 |
Stock In Order Record |
|
|
Demonstration#Please click(swfpage.asp?swfpage=AddDeletestockinproduct.swf)#
[10,100,560,300]:【Stock In Order】record table: In here, it shows all Stock In Order records for your referenece.
|
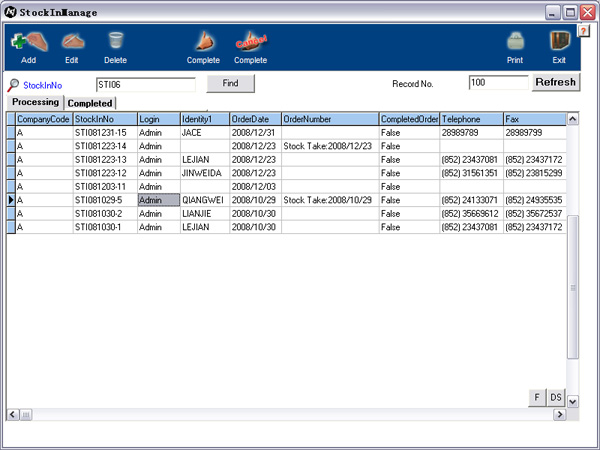
Photo1 |
|
| 5.2 |
Stock
|
|
| |
| 5.2.1 |
Stock |
|
|
Demonstration#Please click(swfpage.asp?swfpage=CheckStock.swf)#
[185,40,55,50]HoldGoods.swf:Graphic button【Hold/Suspend】:Select the product that you want to hold or suspend, and enter the quantity, then it will be marked red for use in the future.
[240,40,45,50]Returnwarehouse.swf:Graphic button【transfer】:transfer the selected item from one warehouse to another.
[285,40,45,50]:Graphic button【transfer record】:record all transferring goods transaction in here for reference.
[370,40,55,50]:Graphic button【Stock take】:In here you can compare and adjust the item quantity in the system and the actual quantity in your warehouse. It is according the warehouse, product ID and date to check, the result would be three mode:【M】 - More、【L】 - Less、【X】 - wrong.
[425,40,55,50]:Graphic button【Safety check】:This function would help you to check the quantity of all the items in each warehouse which are below the safety quantity that you have set it in the material and product record.
[110,410,95,20]:【Update Quantity】button: After renew the quantity of item in warehouse, the system may not be updated the quantity on time, so that you can use this button to update it immediately.
[205,410,75,20]:【Update All Quantity】button: The function is similar to the “update quantity” but it will update all items in the stock record table one by one until the end.
[280,410,30,20]:【0】checkbox:The stock table will show the quantity which is 0 togther.
[310,410,110,20]:【Not Show Mark goods】checkbox: the record table will not show the goods which is marked by Sales Order or Production Job Sheet.
[430,410,150,20]:【Total】button: Calculate the total quantity of the selected items.
|
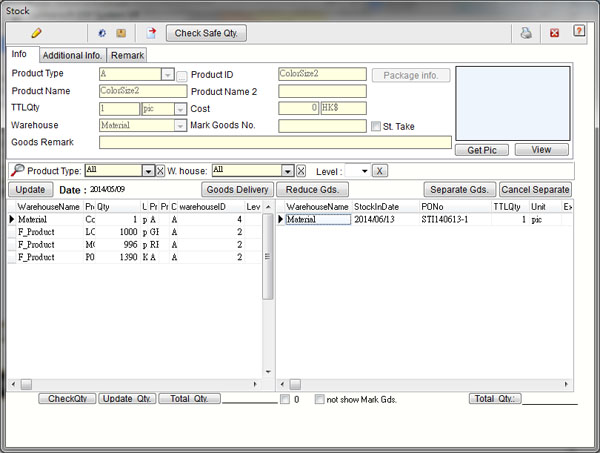
Photo1 |
|
| 5.2.2 |
|
|
|
[185,40,55,50] HoldGoods.swf:Graphic button【Hold/Suspend】:Select the product that you want to hold or suspend, and enter the quantity, then it will be marked red for use in the future.
[240,40,45,50]Returnwarehouse.swf:【Transfer】function:Transfer goods from one warehouse to another.
[285,40,45,50]:【transfer History】function:Record all transferring goods transaction in here fro reference.
[370,40,55,50]Inventory.swf:【Stock take】fucntion:In here you can compare and adjust the item quantity in the system and the actual quantity in your warehouse. It is according the warehouse, product ID and date to check.
[425,40,55,50]: Graphic button【Safety check】:This function would help you to check the quantity of all the items in each warehouse which are below the safety quantity that you have set it in the material and product record.
[5,200,50,20]:【update】function:update all items quantity in each warehouse.
[110,410,95,20]: 【Update Quantity】button: After renew the quantity of item in warehouse, the system may not be updated the quantity on time, so that you can use this button to update it immediately.
[205,410,75,20]: 【Update All Quantity】button: The function is similar to the “update quantity” but it will update all items in the stock record table one by one until the end.
[280,410,30,20]: 【0】checkbox:The stock table will show the quantity which is 0 togther.
[310,410,110,20]: 【Not Show Mark goods】checkbox: the record table will not show the goods which is marked by Sales Order or Production Job Sheet.
[430,410,150,20]: 【Total】button: Calculate the total quantity of the selected items.
|
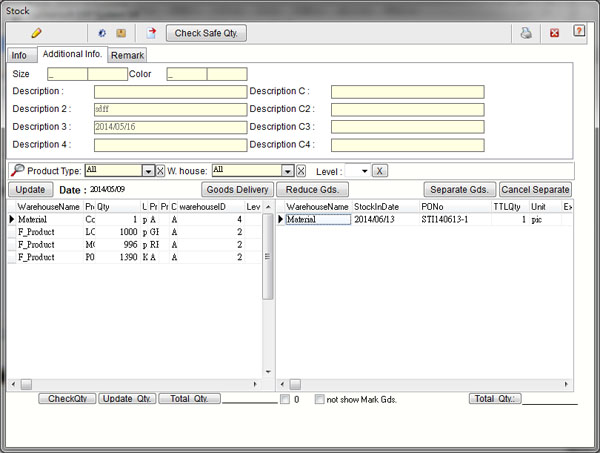
Photo1 |
|
| 5.3 |
Stock Out
|
|
| |
| 5.3.1 |
Stock Out Order |
|
|
[10,120,560,140]:【Stock Out product】record table:List all stock-out-products in here.
[10,290,220,110]:【Warehouse items】record table:List the total quantity of each item in each warehouse.
[230,290,350,110]:【Item in detail】record table:List out all detail of items in different purchase orders.
[380,270,40,20]AddDeleteStockOutProduct.swf:【add】button: Add new item to the stock out order.
[420,270,50,20]:【delete】button:delete items in stock out order.
|
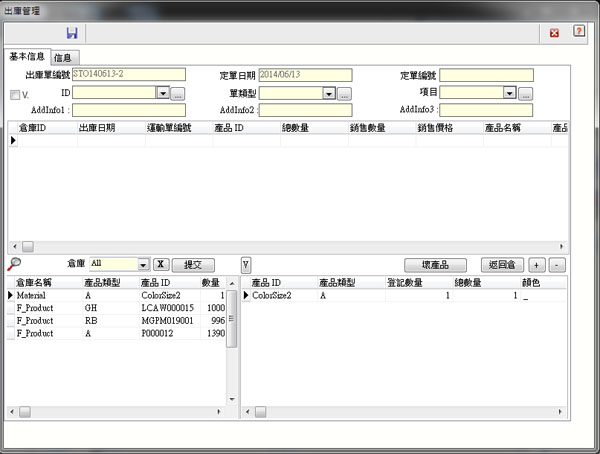
Photo1 |
|
| 5.3.2 |
Stock Out Order Record |
|
|
Demonstration#Please click(swfpage.asp?swfpage=AddDeletestockoutproduct.swf)#
[10,100,560,300]:【Stock Out Order】record table:List all Stock Out Order record in here for you to check.
|
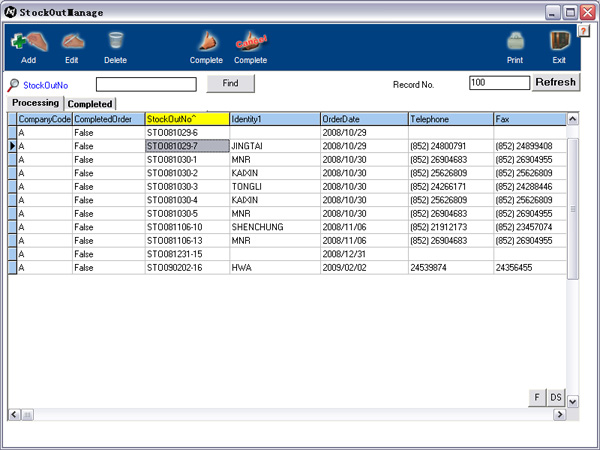
Photo1 |
|
| 6. |
Accounting System |
|
| |
| 6.1 |
Chart of Accounting
|
|
| |
| 6.1.1 |
Account Code |
|
|
Demonstration#Please click(swfpage.asp?swfpage=Chartofaccount.swf)#
[60,225,460,180]:【Account Code】List: In here you can see all your company account code.
[55,130,135,20]ChartofAccount.swf:【Type code】field: Using 4 digital for classify the different type of account code.
[220,130,130,20]:【Type code】description field: Type code description name.
[190,130,25,20]:Account Type Code-Click the …’button enter to the setting of Type main code.
|
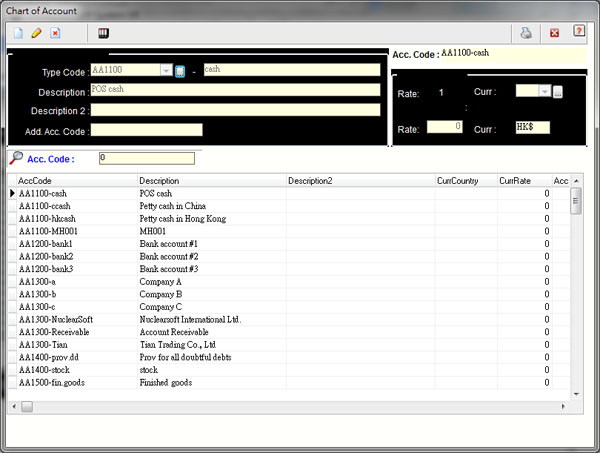
Photo1 |
|
| 6.1.2 |
Account Code 2 |
|
|
|
[85,248,400,170]:【Account code】tree diagram:2 letters and 4 digitals together as an account type code. The first letter is company code, the second letter is according to the following: A – Assets B – Liabitities C – Equity I – Income P – Expenses. Lastly the 4 digitals are for classify the different type of account code. |
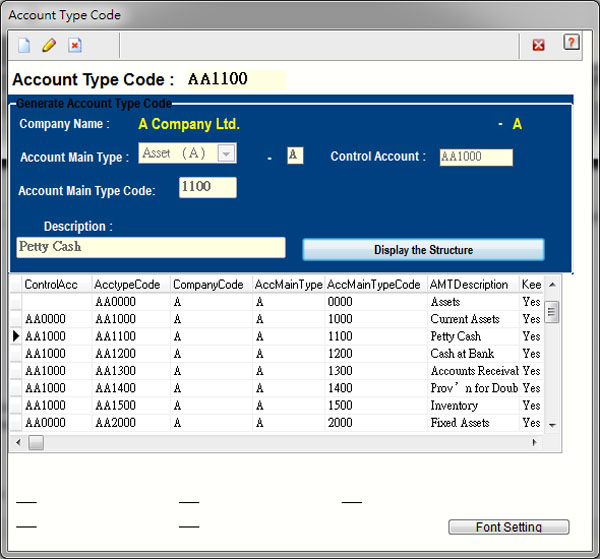
Photo1 |
|
| 6.2 |
Journal
|
|
| |
| 6.2.1 |
Journal |
|
|
Demonstration#Please click(swfpage.asp?swfpage=Journal.swf)#
[10,90,570,270]:Journal List Record: List journals for the period of date.
[350,20,50,50]:Graphic button【Ledger】:You can check the ledger anytime by the selected journal.
[5,375,170,35]:【Date】Menu:You can search the journal by date in here.
[175,375,80,35]:【Search J No.】field: Enter the journal number for searching.
[255,375,100,35]:【Refer. No.】field: Enter refer no. fro searching.
[5,410,120,40]:【History】Date menu: Enter the date for searching the journal at the entry date.
[2,70,100,20]:【Account Date】Date menu:Enter the account date.
[115,70,100,20]:【Account Code】field:you can enter the account code directly or select the account code from the account code list here.
[210,70,380,20]:【description】field:Enter the description for the journal.
|
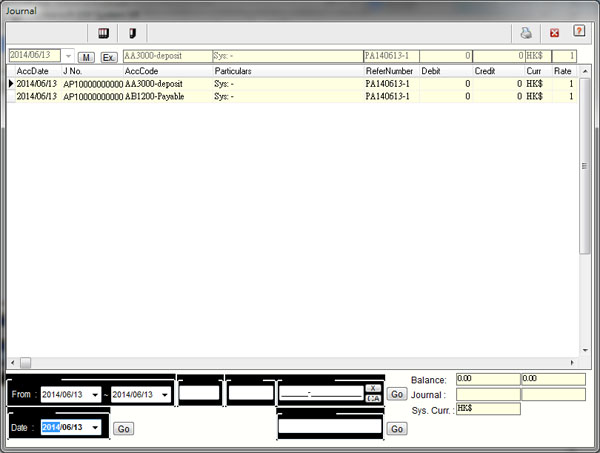
Photo1 |
|
| 6.3 |
Ledger
|
|
| |
| 6.3.1 |
Ledger |
|
|
Demonstration#Please click(swfpage.asp?swfpage=Ledger.swf)#
[10,102,550,280]:【Ledger】Record table: List all journals which is according to the same account code.
[350,40,50,50]:Graphic button【Journal】:Check the journal which is according to the journal no..
[10,385,320,40]:【Search ledger】Menu: Ledger will be shown after you select the account code and the date.
[330,385,260,40]:【Credit Debit Amount】area: The total amount of the credit and debit sides.
|
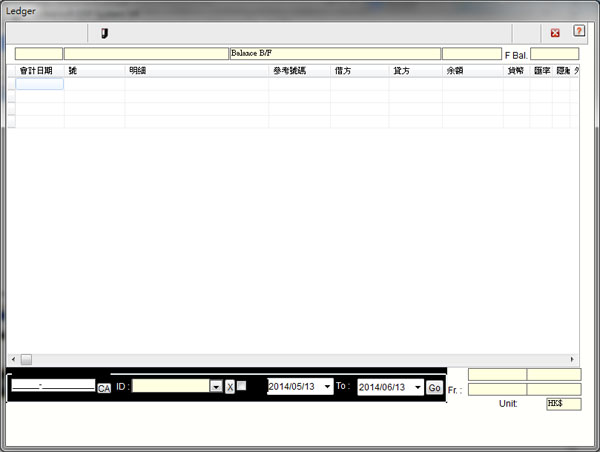
Photo1 |
|
| 6.4 |
Invoice
|
|
| |
| 6.4.1 |
Invoice Record |
|
|
Demonstration#Please click(swfpage.asp?swfpage=Invoice.swf)#
[12,112,570,320]:【Invoice】table record:All invoices are generated by sales orders will store in here for proceed.
[150,25,50,50]InvoiceJournal.swf:Graphic button【Journal】:double click the selected record that you want, ensure the payment balance in the invoice. And then press this button to generate journal to the accounting system automatically.
[200,25,50,50]Receipt_2.swf:Graphic button【receive payment】: Select the invoice in the invoice record and press this button for receiving payment by customer, it will generate a receipt automatically.
|
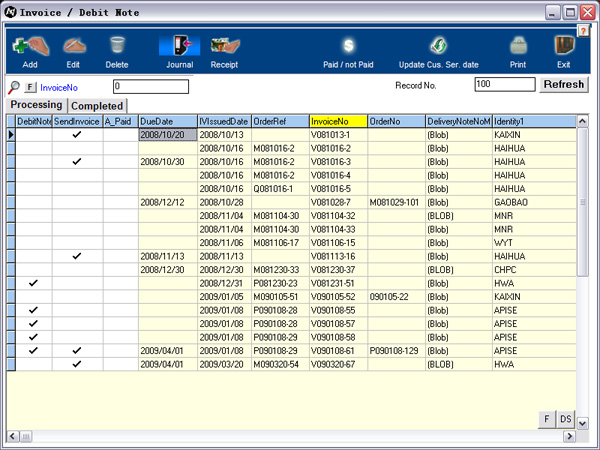
Photo1 |
|
| 6.4.2 |
Invoice |
|
|
[230,70,350,20]:【Import】area:In here you can import quotation or sales order information to the invoice record by entering the order no..
[265,100,70,20]:【Credit Note】checkbox: after you tick the Credit note checkbox, the customer record menu will change to vendor for you to generate a credit note.
[330,120,80,20]:【Sales order no.】checkbox:after you tick the checkbox, the system will calculate the previous sales order balance for this invoice for your reference.
|
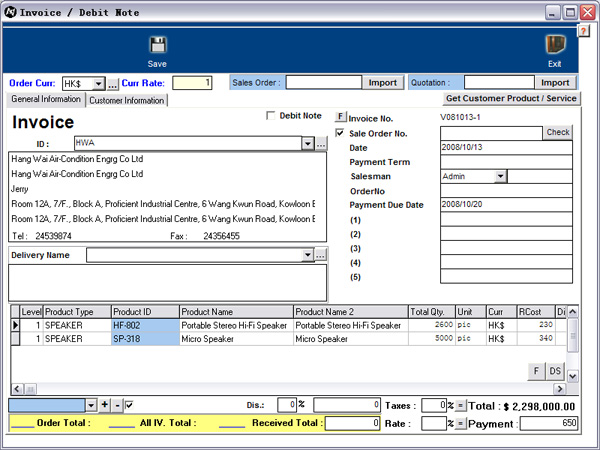
Photo1 |
|
| 6.5 |
Payment Order
|
|
| |
| 6.5.1 |
Payment Order Record |
|
|
Demonstration#Please click(swfpage.asp?swfpage=PayOrder.swf)#
[12,112,570,320]:【Payment Order】Table record: All payment orders are generated by purchase orders will store in here for proceed.
[150,25,50,50]Payjournal.swf:Graphic button【Journal】:double click the selected record that you want, ensure the payment balance in the payment order. And then press this button to generate journal to the accounting system automatically. [200,25,50,50]Cheuqe.swf:Graphic button【Payment】:Select the payment order in the payment order record and press this button to pay to the vendor, it will generate a receipt automatically.
|
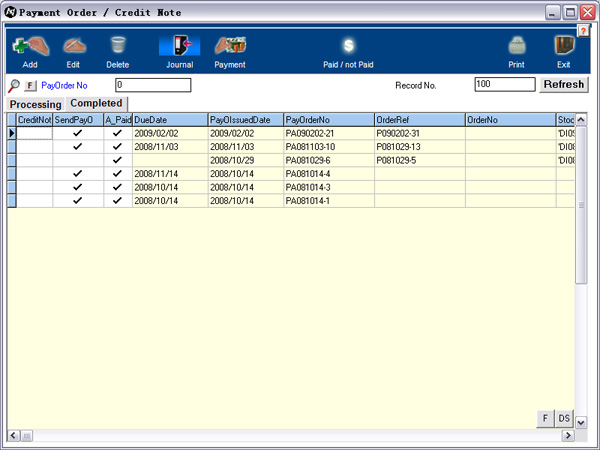
Photo1 |
|
| 6.5.2 |
Payment Order |
|
|
|
[265,100,70,20]:【Debit Note】checkbox: after you tick the debit note checkbox, the vendor record menu will change to customer for you to generate a debit note. |
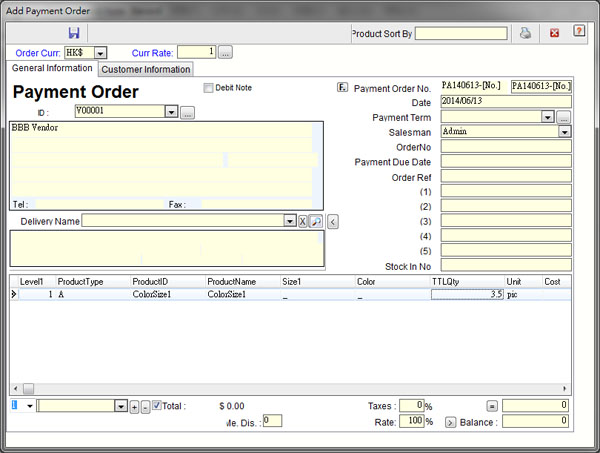
Photo1 |
|
| 7. |
Main |
|
| |
| 7.1 |
System Setting
|
|
| |
| 7.1.1 |
|
|
|
[255,38,115,14]:【Interface Language】: Select your interface language including English, Chinese Traditional and Chinese Simplify.
[255,52,115,14]:【Database Language】:Select the data language which is shown in the ERP system including Chinese Traditional and Chinese Simplify.
[255,66,115,14]:【Translation】: For Chinese translation only just between Chinese Traditional and Chinese Simplify.
[255,88,115,18]:【System Level】: Each user can select simple or advance mode of the ERP system.
[255,119,115,14]:【Host IP address】: Record the ERP server IP address.
[255,133,115,14]:【POS setting】: In here, you can set the POS related setting for the ERP client.
[255,147,115,14]:【Window setting】: Set the window setting including hidden the bar or change the size of ERP.
[255,161,115,14]:【Open the debug interface】: Just for the ERP programmer uses.
[255,175,115,14]:【FTP】: Set the ERP system FTP on and off.
[255,189,115,14]:【Server Update】: Update the setting from ERP server to the ERP client.
|
Photo1 |
|
| 7.2 |
TST Setting
|
|
| |
| 7.2.1 |
TST Setting |
|
|

Photo1 |
|
| 7.3 |
TST Field Setting
|
|
| |
| 7.3.1 |
TST Field Setting |
|
|
Photo1 |
|
| 7.4 |
Login
|
|
| |
| 7.4.1 |
Login |
|
|
[205,135,165,20]:【Host Address】area: Enter the ERP server IP address for client to link up.
[370,135,20,20]:Button【D】: Change to the domain name mode to enter domain name in the "Host Address" area.
[205,155,185,40]:【Login】area: Enter account and password to login.
[220,205,60,20]:【Attendance】area: Click this button for record your attendance in the ERP system.
[280,205,50,20]: Button【Submit】: Enter account and password to login the system by clicking this button.
[330,205,40,20]:Button【Exit】: Exit the ERP client system.
[215,245,160,90]:【Company List】list: List the related member group s companies in the list for user to select.
[332,338,40,20]:Button【Submit】: Select the company then you can login to this company s interface to control.
|

Photo1 |
|
| 7.5 |
Main Interface
|
|
| |
| 7.5.1 |
Main Interface |
|
|
[5,20,320,20]:Menu Bar: All models in the system would be list out from this bar.
[35,40,220,25]:【Control Center】: Bring you to the ERP system s control center.
[340,40,220,25]:【Work Flow】: Bring you to the ERP system s company work flow.
|

Photo1 |
|
| 7.6 |
Workflow
|
|
| |
| 7.6.1 |
Workflow |
|
|
[111,140,450,250]:General information: The whole of the ERP system s general information.
[1,140,110,250]:Different ERP system: In each button can bring you to different ERP system with clear workflow.
|
Photo1 |
|
| 7.7 |
Nuclearsoft ICQ
|
|
| |
| 7.7.1 |
Nuclearsoft ICQ |
|
|
[405,60,40,20]:【Member】Label: List the entire members in the system for you to contact.
[445,60,60,20]:【Nuclearsoft】Tab: If you can want to contact our customer service assistance or sales, here you can link with us.
[505,60,60,20]:【Sound】Checkbox: Open the sound or not for the ICQ.
[405,80,185,190]:Member List: List the entire members in the system.
[405,270,185,100]:Chatting record: Record the whole chatting history in the ERP system.
|
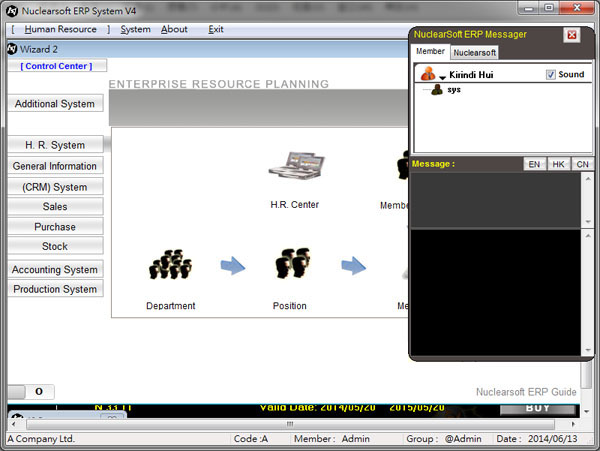
Photo1 |
|
| 7.8 |
Control Center
|
|
| |
| 7.8.1 |
Personal Control Center |
|
|
In here, it would record your job arrangement including the job target, job period, status and etc.
[5,82,135,20]:【Add job】 area: Add, Edit and Delete the selected job arrangement.
[5,102,270,110]:【Job arrangement information】area: The information is including job type, project name, job title, date and attached file.
[300,190,80,20]:【Job completed】checkbox: You can tick this checkbox when the job has been finished.
[10,245,560,165]:【All job list】: List all the job arrangement in the table record.
[10,225,250,20]:【Job】Tab: All jobs can be classified into different status in the job list.
[70,62,50,20]:【Company Board】Tab: Company announces its rules or regulations in here for ERP users.
|

Photo1 |
|
| 7.8.2 |
Company Control Center |
|
|
In here, you can view the whole ERP system s different orders total amount and the chart for your company analysis.
[25,80,125,100]:Graphic button【Bar Chart】: Click this button for the bar chart display.
[150,80,65,100]:【Order quantity】area: List the quantity of the selected order and the selected time period.
[215,80,107,100]:【Total Amount】area: List the total amount of the selected order in the selected time period.
[322,140,240,40]:【Receivable and payable】area: List the invoices and payment orders for receivable and payable amount.
[570,135,20,40]:Graphic button【Reminder】: Remind the payment date and the date of receivable.
[15,285,560,150]:【Bar Chart】area: Display the selected order s bar chart.
|
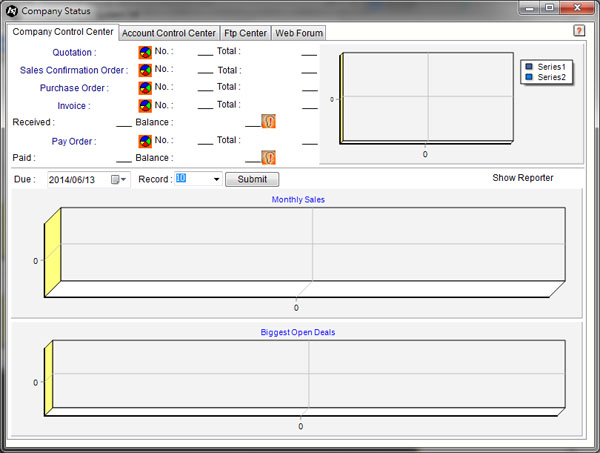
Photo1 |
|
| 7.8.3 |
Accounting Control Center |
|
|
[120,42,380,20]:【Search】area: At the top of the accounting control center, you can select country, start date and finish date, and then press “Submit” button. The customers receivable and vendors payable amount is shown on left and right hand side s table records.
[5,62,580,238]:【Receivable and Payable】List: At the left hand side is account receivable, right hand side is account payable. You can double click on the selected record for detail journals.
[5,312,45,20]:【ALL】Checkbox: Click the “ALL” button at the bottom, the receivable and payable table record will shown all records including the amount is 0.
[50,312,85,20]:【Invoice record】button: In here, you can check the customers invoice record whenever by clicking this button.
[343,312,100,20]:【Payment order record】button: In here, you can check the vendors payment order record whenever by clicking this button.
[443,312,83,20]:【Buying Report】button: this button is at the vendor side for user to check the goods that you have bought by date, vendor or etc..
[20,425,90,20]:【Order Status】button: It will show an accounting data which is related with invoice and payment order.
[110,425,85,20]:【Profit and loss】button: It will show the profit and loss status of the company.
[190,425,90,20]:【Bank and cash】button: It will show the accounting of bank and cash status of the company.
|
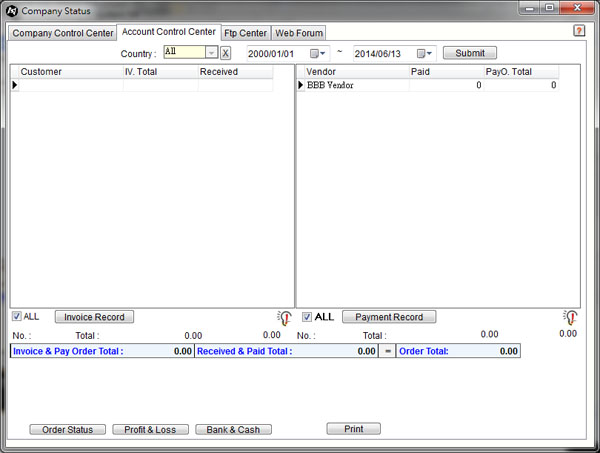
Photo1 |
|
| 7.8.4 |
Ftp Control Center |
|
|
FTP – File upload and download by internet in Nuclearsoft ERP system.
[5,255,160,180]:【local path】list: List your computer drives and path
[165,255,330,150]:【local files】list: List all files under selected path.
[470,400,120,30]:【Edit File】button: Control file buttons “Delete” and “Open” buttons for delete and edit files that you want.
[505,260,80,80]:Graphic button【Upload】: Upload the selected file to the ERP server.
[505,180,80,80]:Graphic button【Download】: Download the selected file from the ERP server.
[5,42,500,210]:【Server files】list: this area display all server ftp files.
[505,42,90,20]:【FTP on/off】button: Open and manage FTP files.
[505,100,90,80]:【FTP file manage】area: you can add, edit and delete files in server ftp area.
|

Photo1 |
|
| 7.8.5 |
Web Forum |
|
|
This function is available when the ERP system link with Nuclearsoft web system. Detail information refer to Nuclearsoft web system V2.
[]: |
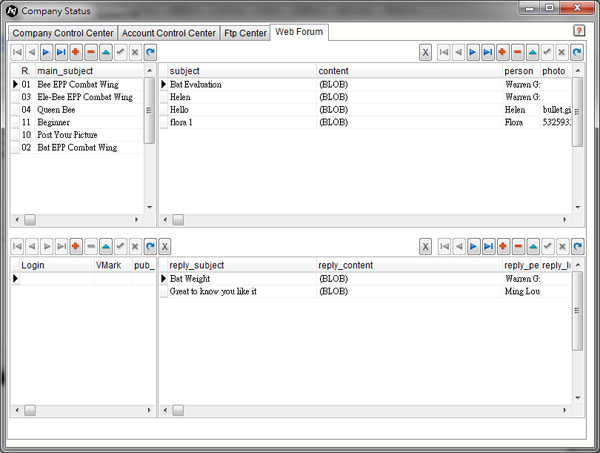
Photo1 |
|
| 7.9 |
TST Record
|
|
| |
| 7.9.1 |
TST Record |
|
|
Photo1 |
|
| 8. |
(MRP) System |
|
| |
| 8.1 |
Product Assembly
|
|
| |
| 8.1.1 |
Product Assembly |
|
|
Demonstration#Please click(swfpage.asp?swfpage=AddBOMProduct.swf)#
[180,110,195,20]Procedure.swf:【Procedure】field:Record the semi-product procedure for the selected item.
[375,110,80,20]AddBOMProduct.swf:【Assembly】button :After clicking this button,you can assembly different part to the selected items for the BOM.
[455,110,120,20]EditBOMRemark.swf:【Quantity/remark】button: After you select the parts for the selected item, then you can enter quantity to each part for producing use.
[440,235,140,20]CopyBOM.swf:【Copy】button: If you have similar BOM item in the record table, you can select it and copy it to the current item.
|
Photo1 |
|
| 8.2 |
Sample Order
|
|
| |
| 8.2.1 |
Sample Order Record |
|
|
Demonstration#Please click(swfpage.asp?swfpage=AddSampleOrderproduct.swf)#
[10,115,560,300]SearchSampleOrder.swf:【Sample Order】record table:List all sample order records in here for reference.
[5,95,100,20]:【Processing, completed】Tab:Separate processing order and the completed order into different folders.
[445,25,50,50]:graphic button【BOM】:List the selected sample order BOM struture.
|
Photo1 |
|
| 8.2.2 |
Sample Order |
|
|
[5,100,50,20]:【General】tab:the general information of the sample order.
[55,100,50,20]:【Customer】Tab:customer information for the sample order.
[365,75,210,20]AddSampleOrderProduct.swf:【Sample order import】field:You can import other sample order information to the current sample order.
[5,120,20,20]:button【^】: At the BOM record table, you can double click to the material to see its assembly items, and you can go back to the top level by clicking this button.
[330,120,160,20]:【Product ID】button: click the‘…’button to select the main product, and generate BOM and the Material usage automatically.
[490,120,75,20]:【Total】button:You can calculate the total amount of all material in the material usage record table.
|

Photo1 |
|
| 8.3 |
Production Job Sheet
|
|
| |
| 8.3.1 |
Production Job Sheet Record |
|
|
Demonstration#Please click(swfpage.asp?swfpage=PSStockIn.swf)#
[10,110,560,180]:【Production Job sheet】record table: List all Production Job Sheet in the record table for reference.
[140,25,70,50]PSStockIn.swf:Graphic button【finished goods】: Arrange the finish goods to the warehouse from the selected Production Job sheet.
[270,25,50,50]:Graphic button【Print Production Job Sheet】:Print out the selected Production Job sheet.
[380,25,50,50]:Graphic button【Print Picking List】:Print out the materials which are used by the production job sheet products.
[430,25,50,50]:Graphic button【Print Material Usage】:Print the Materials which will be used in the selected Production Job Sheet.
[480,25,50,50]:Graphic button【Picking List】: Arrange the material delivery from the warehouse according to the Material usage
[5,90,95,20]: 【Processing, completed】tab:Separate processing order and the completed order into different folders.
[360,325,60,20]:【Show】button:display the materials which have been used by the selected production job sheet.
|
Photo1 |
|
| 8.3.2 |
Production Job Sheet |
|
|
[305,70,270,20]:【Import Sales Order】field: You can import the sales order production and information to the current production job sheet.
[5,160,570,80]:【Production line】record table:List the products which is going to be produced in the production job sheet.
[5,295,560,90]:【Material usage】record table: List all materials from the production line products in the list.
[5,160,85,25]:【Sample No.】field –record table:In each production line product can has more than one sample order for production, you can select the suitable one for the product.
[330,255,185,20]ChooseWarehouse.swf:【Finish warehouse】menu:select the warehouse for the finish goods which will go to.
[515,255,60,20]:【Submit】button: It will calculate the total material usage from the production line product after pressing this button.
[280,275,110,10]:【warehouse】menu: In here you can check the stock quantity according to the material in the material usage record table.
[3,400,40,20]:【+】【-】button: Add and delete materials in the material usage record table.
|
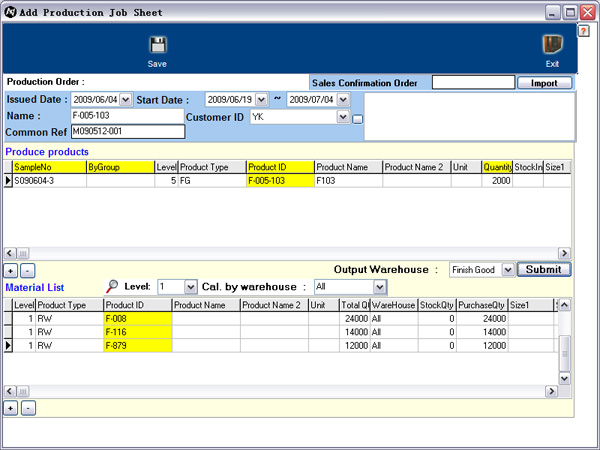
Photo1 |
|
| 8.3.3 |
Picking List |
|
|
[5,40,560,80]:【Material usage】record table:List the material usage of the selected Production Job Sheet.
[5,148,560,70]:【Stock】record table:list all material in the record table according to the selected Material in Material usage record table.
[5,300,560,110]:【Used Material】record table:list all materials have been used by the production job sheet.
[140,240,50,50]:Graphic button【reminder】:Check the materials have not been used according to the material usage record table.
[235,240,50,50]Picking_M.swf:graphic button【Picking】:select the material in stock record table and press this button to use it.
[285,240,50,50]:Graphic button【Cancel】: Cancel the picking action and return back the material to the stock record table.
[355,240,50,50]badgoodsandcancel.swf:graphic button【Bad material】: Record the bad material by withdrawing some of the used material to be bad material of the production Job sheet.
[445,240,50,50]moregoodsandcancel.swf:Graphic button【More material】:Record additional material which is not enough to use according to the material usage in the production job sheet.
|
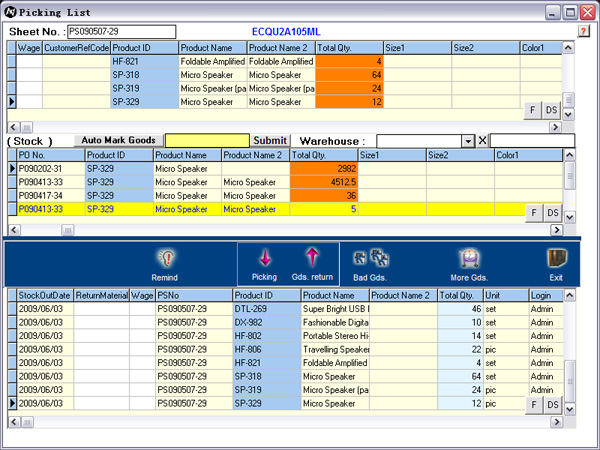
Photo1 |
|
| 8.4 |
Production Material Plan (MRP)
|
|
| |
| 8.4.1 |
MRP |
|
|
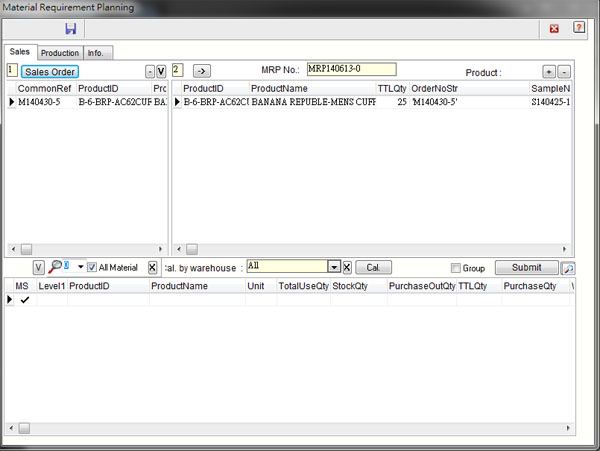
Photo1 |
|
| 8.4.2 |
MRP (Enterprise) |
|
|
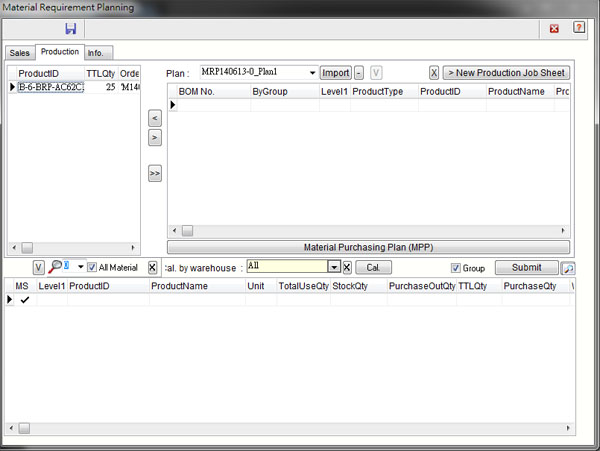
Photo1 |
|
| 8.5 |
BOM Order
|
|
| |
| 8.5.1 |
BOM Order |
|
|
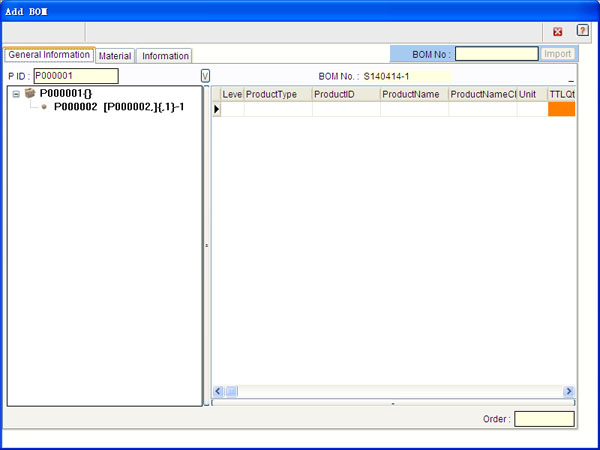
Photo1 |
|
| 9. |
Server |
|
| |
| 9.1 |
Main
|
|
| |
| 9.1.1 |
Login |
|
|
Photo1 |
|
| 9.1.2 |
Language |
|
|
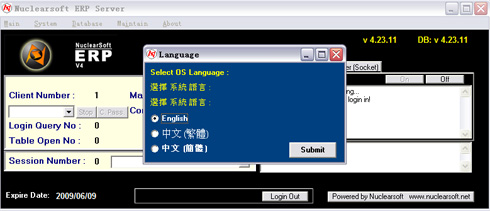
Photo1 |
|
| 9.1.3 |
|
|
|
Photo1 |
|
| 9.1.4 |
File Size |
|
|
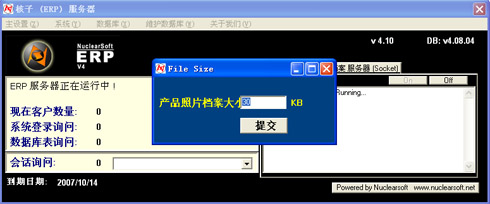
Photo1 |
|
| 9.1.5 |
Display Record No. |
|
|
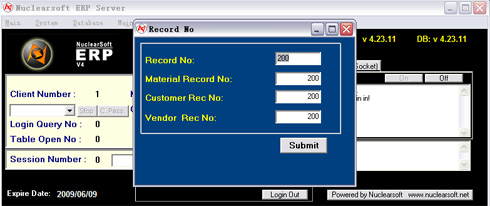
Photo1 |
|
| 9.1.6 |
Precision Setting |
|
|
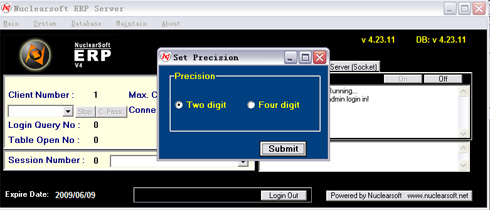
Photo1 |
|
| 9.1.7 |
|
|
|
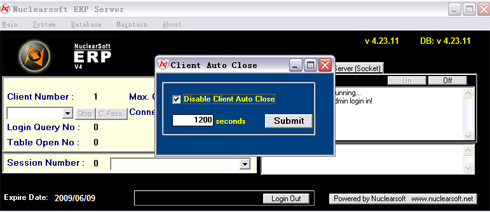
Photo1 |
|
| 9.1.8 |
Company Record |
|
|
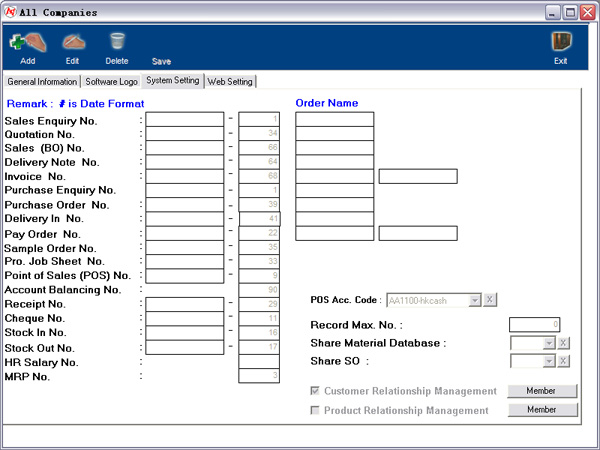
Photo1 |
|
| 9.1.9 |
Member |
|
|
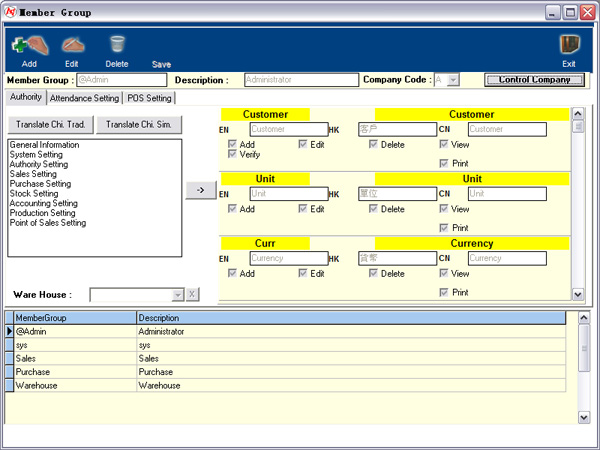
Photo1 |
|
| 9.2 |
System
|
|
| |
| 9.2.1 |
Inventory System |
|
|
Photo1 |
|
| 9.2.2 |
Accounting System |
|
|
Photo1 |
|
| 9.2.3 |
File System |
|
|
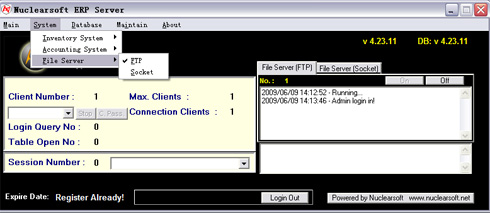
Photo1 |
|
| 9.3 |
Database
|
|
| |
| 9.3.1 |
Datebase Path |
|
|
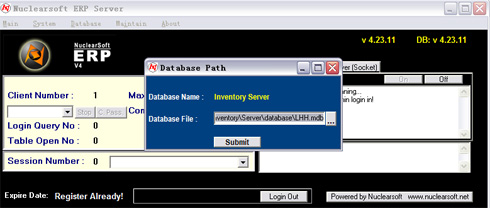
Photo1 |
|
| 9.3.2 |
Backup Path |
|
|
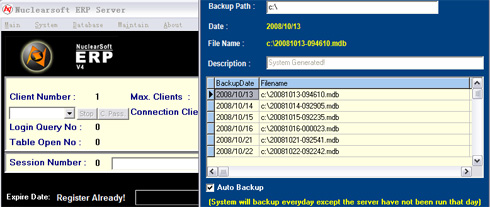
Photo1 |
|
| 9.3.3 |
Restore database |
|
|
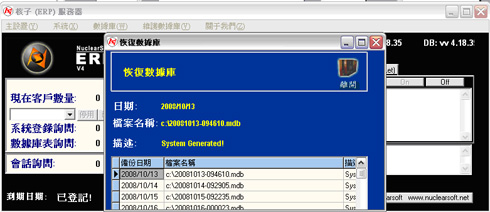
Photo1 |
|
| 9.4 |
Maintain Database
|
|
| |
| 9.4.1 |
Maintain database |
|
|
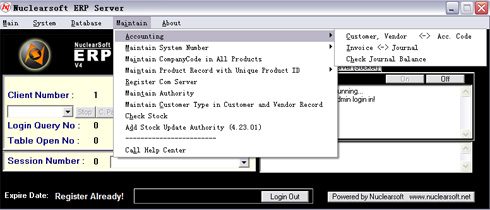
Photo1 |
|
| 9.5 |
Update Passwore
|
|
| |
| 9.5.1 |
|
|
|
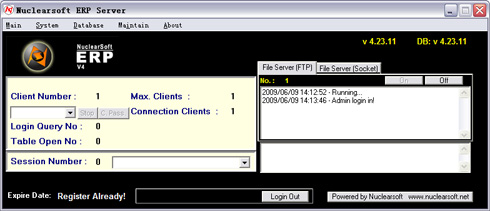
Photo1 |
|
|
|
>